This guide explains how to create, configure, and launch WhatsApp broadcast campaigns using the WA Boom Campaign Manager.
With the Campaign tool, you can select approved templates, target specific contact groups, and schedule automated messages that deliver at scale through the official WhatsApp Business API.
Overview #
The Campaign Manager allows businesses to:
- Send bulk WhatsApp messages using approved templates.
- Personalize content with variables and dynamic data.
- Segment recipients by groups, labels, or language.
- Schedule campaigns for future execution.
- Track delivery, read rates, and failures in real time.
Each campaign follows a simple two-step process — Template Setup and Contacts & Scheduling — ensuring smooth configuration and reliable performance.
Step 1: Choose and Configure the Template #
- Select a Template
Choose from your list of approved WhatsApp templates. Each template includes its language code and category (for example, MARKETING or UTILITY).
Only pre-approved templates can be used to ensure compliance with WhatsApp Business policy. - Add a Header (Optional)
You may upload an image to personalize your message. The header supports images that align with WhatsApp’s media guidelines. - Customize the Body
Templates may include placeholders such as{{1}}or{{2}}.
Use the dropdown “Assign content for {{1}} variable” to insert the correct text, such as a customer name or product title. - Preview the Message
A live Message Preview panel on the right side displays exactly how the message will appear on WhatsApp, including your logo, links, and dynamic content.
Step 2: Add Contacts and Schedule the Campaign #
- Campaign Title
Enter a clear, descriptive name for the campaign (for example, August Update 2024). - Target Contacts
Choose the contact group(s) you wish to send the campaign to.- Groups/Contact: Select specific groups you have created.
- Labels/Tags: Filter contacts by labels such as Leads, Customers, or Follow-up.
- Restrict by Language (Optional)
Enable the option to send messages only to contacts whose preferred language matches the template’s language code. - Schedule the Campaign
You can either:- Send Now to execute immediately, or
- Toggle Schedule to select a specific date and time.
- Set Expiry
Define how long messages should remain valid. If a message exceeds the expiry limit before being sent, it will be marked as expired and excluded from processing. - Select Sending Number
Choose the registered WhatsApp Business number through which the campaign will be executed. - Click “Schedule Campaign”
Once all details are reviewed, click the Schedule Campaign button to confirm.
Campaign Execution and Monitoring #
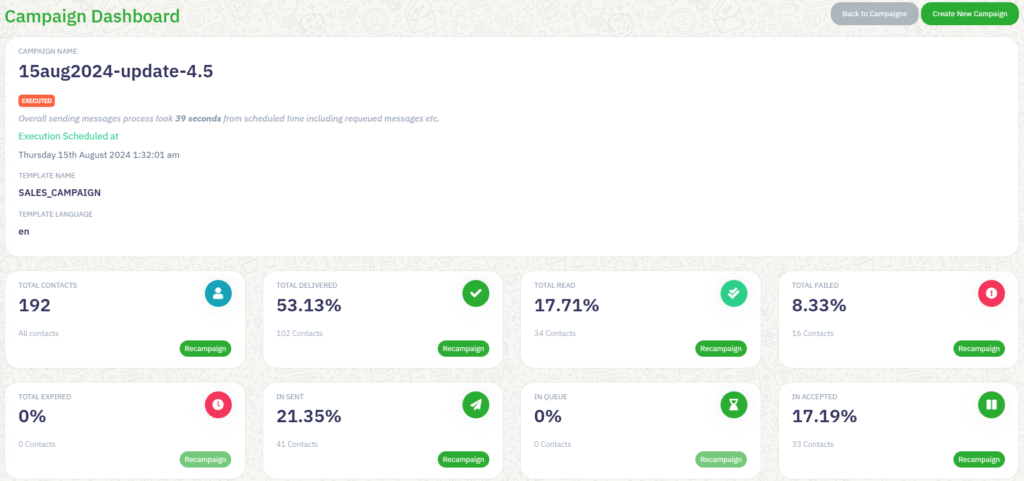
After scheduling, the campaign will appear in your Campaign Dashboard with real-time metrics:
- Total Contacts – The total number of targeted recipients.
- Total Delivered – The percentage of messages successfully delivered.
- Total Read – The percentage of delivered messages that were opened.
- Total Failed – Messages that could not be delivered due to invalid numbers or other issues.
- In Sent / In Queue / In Accepted – Stages indicating messages currently being processed or awaiting delivery.
- Recampaign – Allows you to resend messages to failed or unread contacts directly.
Each campaign report helps you measure engagement, identify delivery issues, and improve performance for future broadcasts.
Best Practices #
- Always verify your message template approval status before scheduling.
- Segment audiences to ensure relevant communication.
- Avoid sending identical messages too frequently to reduce blocking risk.
- Schedule campaigns during active hours for your target region.
- Use dynamic placeholders for personalization (for example, customer names or order IDs).
Troubleshooting #
| Issue | Possible Cause | Solution |
|---|---|---|
| Low delivery rate | Unverified or inactive WhatsApp number | Check API status and reconnect your number. |
| Messages expired | Campaign delayed beyond expiry time | Reschedule or extend expiry before sending. |
| Failed sends | Invalid or non-WhatsApp numbers | Clean and validate contact list before re-sending. |


